Project and styling by Juliet Bawden
Photographs by Antonia Attwood
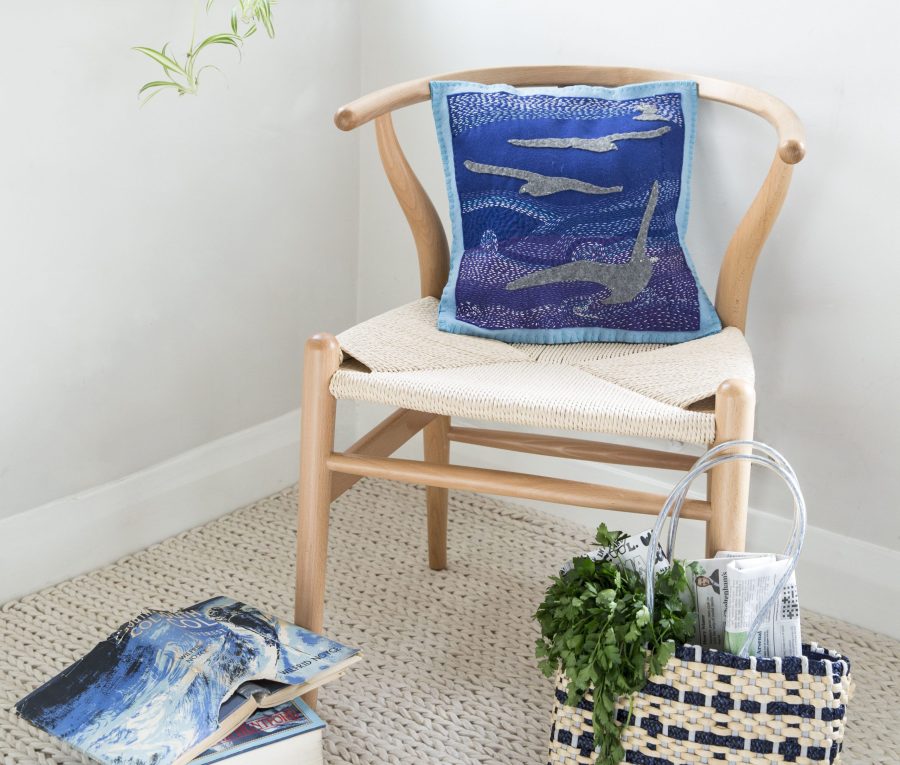
Three things inspired this month’s craft project, the sea, gulls and the effective but random looking stitching currently used by many fine art embroiderers. They in turn appear to have been inspired by Asian quilts made out of recycled Sari’s. I embroidered the cushion front in free hand stitches. I wanted to create the curls where the waves turn over themselves and also the subtle changes of colour in the waves and the sky. To achieve the turbulence of the weather I used two background colours of felt and also different colours of the embroidery floss. The changing direction and sizes of the stitches helps to suggest movement.
If you are not happy just doing freehand stitches using a water erasable pen, draw your design onto the cushion front, embroider over the pen lines. To get rid of the pen marks, dampen a cloth and rub quite lightly.
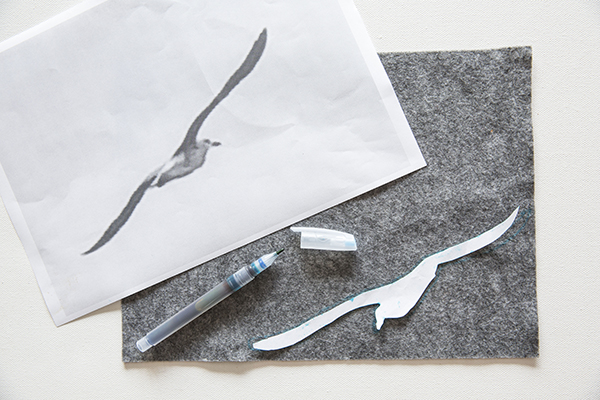
I expect, like you, I am forever taking photographs when I am by the sea. I took the images of the gulls using my phone. I increased the size of them and then printed them out quite large. Before cutting out in felt, I placed the paper gulls onto the stitched front and arranged in a pleasing composition. I then drew round the gull images onto the felt and cut out and then pinned and tacked the grey felt gulls onto the cushion front.
You will need
- Piece of felt 100cm x 100cm x 3mm deep in pale blue felt for the cover
- 36cm square cushion pad
- Felt squares or oblongs in grey, marine blue and purple
- Embroidery floss in light grey, white, mid blue and turquoise
- Tapestry needle
- Sewing needle
- Printer and images of flying seagulls
- Water erasable pen
- Paper scissors
- Dressmaking Shears
- Dress makers pins
For the back opening cushion cover
Cut the cushion front 37cm x 37cm and cut the two cushion backs one 22cm x 37cm and the other 30cm x 37cm in pale blue felt.
Step 1
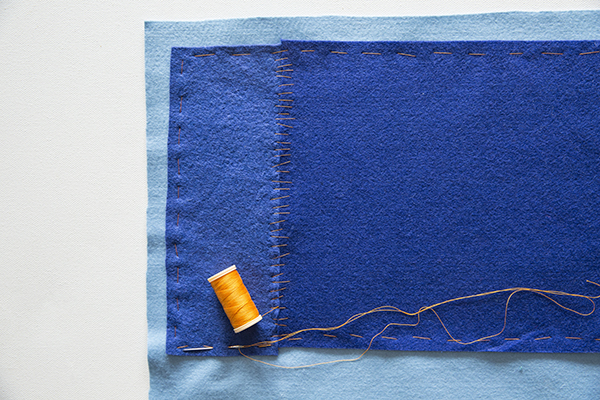
Work on the cushion front, leave a 2 cm border round the edge, and using brightly coloured thread, tack a piece of dark marine blue felt onto another piece and onto the cushion front so it measures 22cm x 32cm.

Step 2
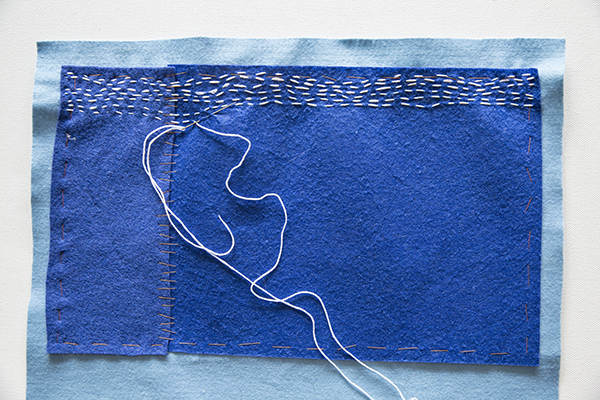
Thread the whole six strands of a piece of white embroidery floss into a tapestry needle and sew random sized running stitches from the left side of the felt to the right and back again, creating 7 uneven rows of stitches. Change colour and sew 7 rows in pale blue.

Step 3
Repeat step 1 using the purple felt. Make sure it joins onto the blue felt and will measure roughly 32cm x 11.5cm. You don’t need to cover the whole of the cushion in stitches, the effect you are after is the waves of the sea. Print images of gulls, draw round and cut out in grey felt.

Step 4
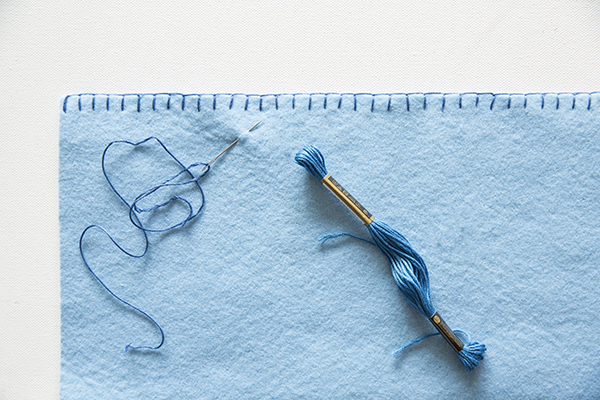
Arrange, pin and sew the gulls onto the cushion front. Using turquoise thread, blanket stitch along one long edge of the cushion back. Make an envelope opening for the cushion pad. With the two back pieces over lapping in the centre of the cushion, sew together round the edge using blanket stitch.
Needles, embroidery floss, pins and scissors and erasable marker pen from sew.korbond.co.uk
Check out more coastal-inspired arts and crafts here.
Project and styling by Juliet Bawden
Photographs by Antonia Attwood
Three things inspired this month’s craft project, the sea, gulls and the effective but random looking stitching currently used by many fine art embroiderers. They in turn appear to have been inspired by Asian quilts made out of recycled Sari’s. I embroidered the cushion front in free hand stitches. I wanted to create the curls where the waves turn over themselves and also the subtle changes of colour in the waves and the sky. To achieve the turbulence of the weather I used two background colours of felt and also different colours of the embroidery floss. The changing direction and sizes of the stitches helps to suggest movement.
If you are not happy just doing freehand stitches using a water erasable pen, draw your design onto the cushion front, embroider over the pen lines. To get rid of the pen marks, dampen a cloth and rub quite lightly.
I expect, like you, I am forever taking photographs when I am by the sea. I took the images of the gulls using my phone. I increased the size of them and then printed them out quite large. Before cutting out in felt, I placed the paper gulls onto the stitched front and arranged in a pleasing composition. I then drew round the gull images onto the felt and cut out and then pinned and tacked the grey felt gulls onto the cushion front.
You will need
- Piece of felt 100cm x 100cm x 3mm deep in pale blue felt for the cover
- 36cm square cushion pad
- Felt squares or oblongs in grey, marine blue and purple
- Embroidery floss in light grey, white, mid blue and turquoise
- Tapestry needle
- Sewing needle
- Printer and images of flying seagulls
- Water erasable pen
- Paper scissors
- Dressmaking Shears
- Dress makers pins
For the back opening cushion cover
Cut the cushion front 37cm x 37cm and cut the two cushion backs one 22cm x 37cm and the other 30cm x 37cm in pale blue felt.

Step 1
Work on the cushion front, leave a 2 cm border round the edge, and using brightly coloured thread, tack a piece of dark marine blue felt onto another piece and onto the cushion front so it measures 22cm x 32cm.
Step 2
Thread the whole six strands of a piece of white embroidery floss into a tapestry needle and sew random sized running stitches from the left side of the felt to the right and back again, creating 7 uneven rows of stitches. Change colour and sew 7 rows in pale blue.
Step 3
Repeat step 1 using the purple felt. Make sure it joins onto the blue felt and will measure roughly 32cm x 11.5cm. You don’t need to cover the whole of the cushion in stitches, the effect you are after is the waves of the sea. Print images of gulls, draw round and cut out in grey felt.
Step 4
Arrange, pin and sew the gulls onto the cushion front. Using turquoise thread, blanket stitch along one long edge of the cushion back. Make an envelope opening for the cushion pad. With the two back pieces over lapping in the centre of the cushion, sew together round the edge using blanket stitch.
Needles, embroidery floss, pins and scissors and erasable marker pen from sew.korbond.co.uk
Check out more coastal-inspired arts and crafts here.